


Introduction
Knowing how to take a screenshot on an HP laptop is an essential skill for quickly capturing and sharing information. Whether you're saving a receipt, reporting an IT issue, or grabbing a slide from a presentation, this guide will walk you through several easy methods, from simple keyboard shortcuts to more advanced tools. By the end, you'll be able to capture your screen quickly and efficiently.
Why This Matters
In our fast-paced digital world, visual communication is key. A screenshot can often explain a problem or share an idea more effectively than a long email. Mastering this skill on your HP laptop streamlines your workflow, improves communication with colleagues, and provides a quick way to document important information, saving you time and preventing misunderstandings.
Step-by-Step Guide: Capturing Your HP Screen
Your HP laptop comes with several built-in methods for taking screenshots, each suited for a different situation. Let's explore the most effective ones, starting with the classic keyboard shortcuts.
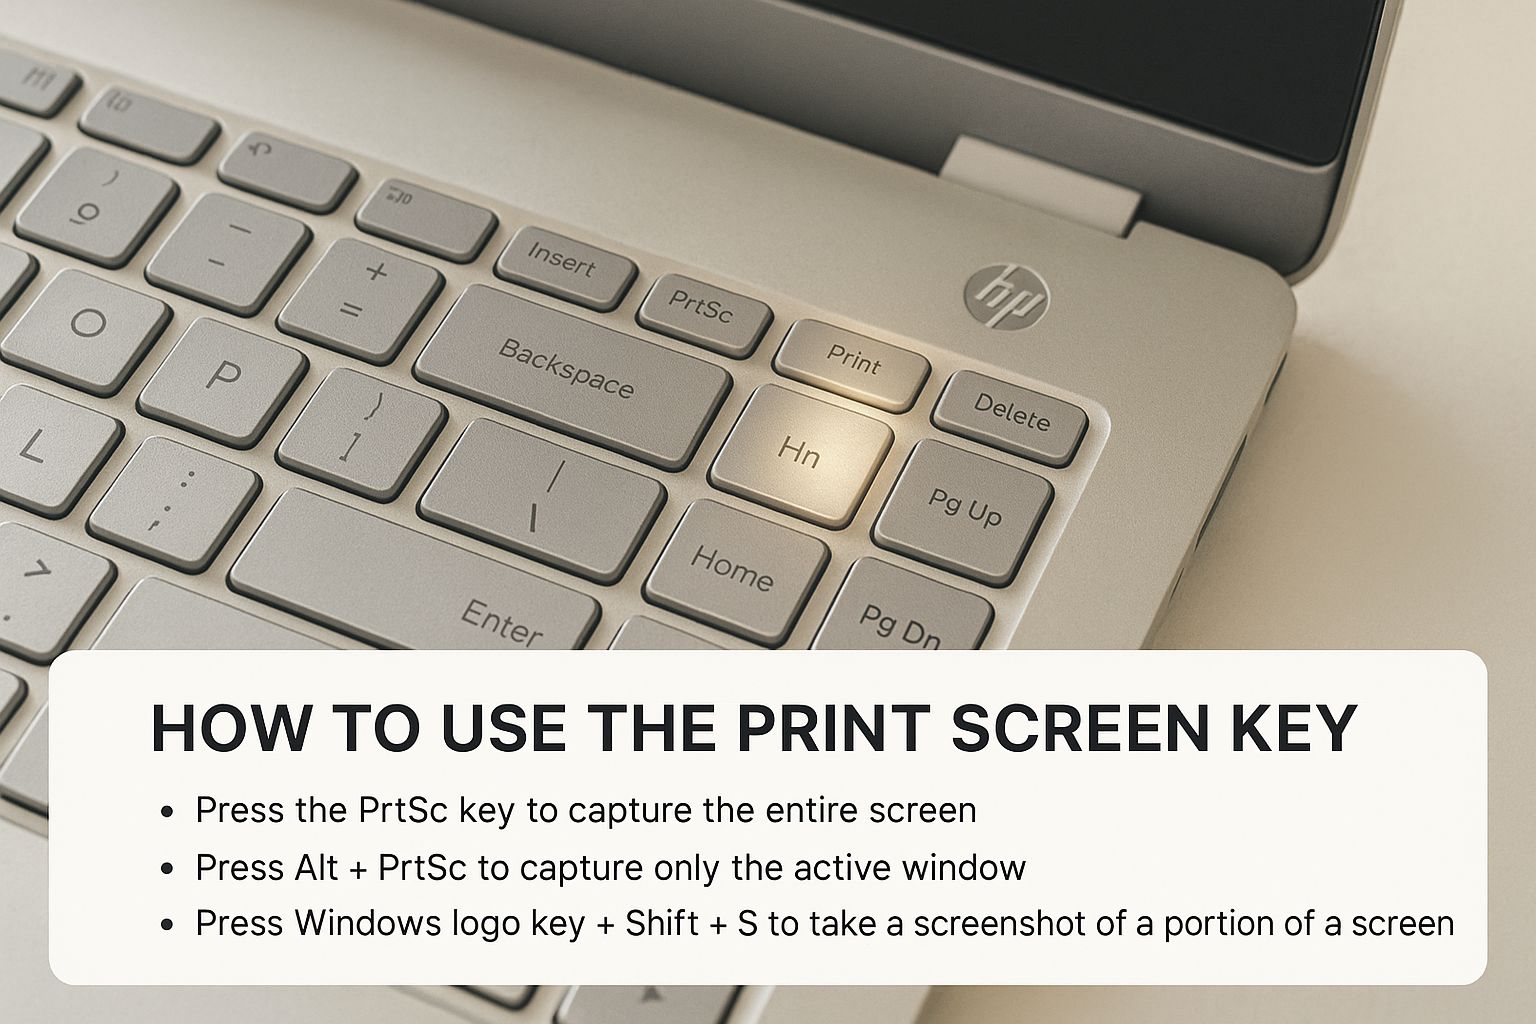
Method 1: Using the Print Screen (PrtSc) Key
The Print Screen (PrtSc) key is the most traditional way to take a screenshot. It's fast, simple, and perfect for quick captures.
- Locate the PrtSc key: You'll usually find it in the top row of your keyboard. On some HP laptops, you may need to use the Fn key in combination with it (e.g., Fn + PrtSc).
- Choose your shortcut:
- Press PrtSc: This copies your entire screen to the clipboard. You will then need to paste (Ctrl + V) the image into an application like Paint, Microsoft Word, or an email to save or share it.
- Press Alt + PrtSc: This captures only the active window (the app or dialog box you are currently using). This is great for focused screenshots without desktop clutter.
- Press Windows Key + PrtSc: This is the most efficient shortcut. It captures the entire screen and automatically saves it as an image file in your
Pictures > Screenshotsfolder. Your screen will briefly dim to confirm the capture.
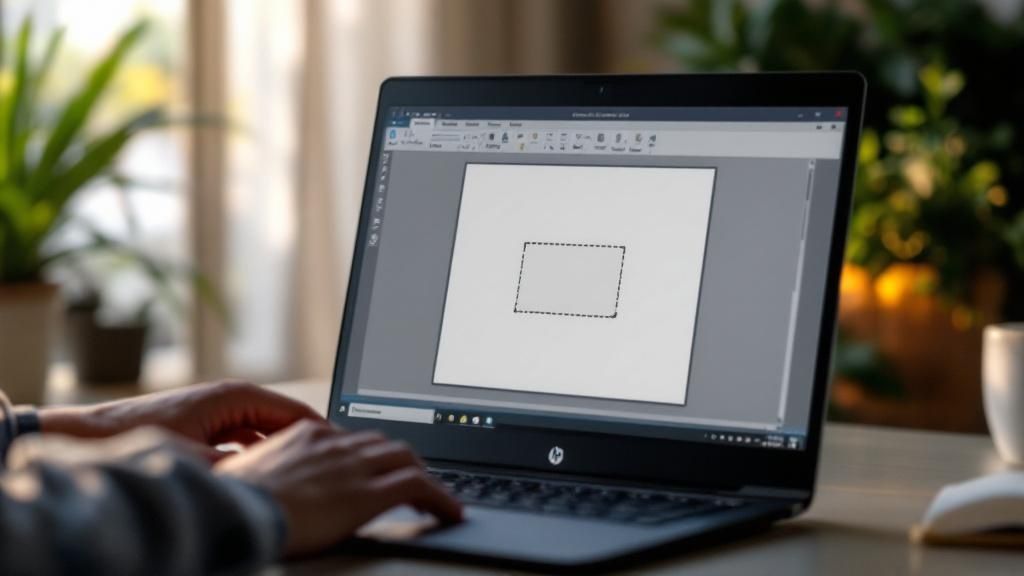
Method 2: Using the Snipping Tool (or Snip & Sketch)
For more precision and control, the Snipping Tool is your best option. It allows you to capture specific parts of your screen.
- Launch the tool: The fastest way is to press the shortcut Windows Key + Shift + S.
- Select a capture mode: A small toolbar will appear at the top of your screen with several options:
- Rectangular Snip: Drag your cursor to draw a box around the area you want to capture.
- Freeform Snip: Draw any shape you like to capture a custom-shaped area.
- Window Snip: Click on a specific window to capture just that window.
- Fullscreen Snip: Captures your entire screen.
- Edit and save: After you take your snip, the image is copied to your clipboard. A notification will appear; click it to open the editor where you can add annotations, highlight text, crop, and save the file.
Method 3: Using the Xbox Game Bar
Originally for gamers, the Xbox Game Bar is a powerful tool for capturing screenshots and videos, especially in full-screen applications.
- Open the Game Bar: Press Windows Key + G to open the overlay.
- Capture your screen: In the "Capture" widget, click the camera icon to take a screenshot.
- Use the shortcut: For an even faster capture, use Windows + Alt + PrtSc to take a screenshot of the active application without opening the full overlay. Screenshots are saved in the
Videos > Capturesfolder.
Tips and Best Practices
- Be Specific: Avoid capturing your entire desktop. Use Alt + PrtSc or the Snipping Tool's rectangular snip to focus only on the relevant information. This makes your screenshot cleaner and easier to understand.
- Annotate for Clarity: Use the editing features in the Snipping Tool to add arrows, boxes, or text to highlight key areas. This helps guide your audience's attention exactly where you want it.
- Protect Your Privacy: Before sharing a screenshot, blur or crop out any sensitive information like usernames, passwords, or personal details.
- Organize Your Files: If you use Windows Key + PrtSc frequently, your Screenshots folder can get cluttered. Take a moment to rename your files descriptively (e.g., "Login_Error_May24.png") so you can find them easily later.
- Choose the Right Format: Save your screenshots as PNG files. This format preserves the sharpness of text and interface elements, unlike JPG which is better for photos and can make text look blurry.
Example Use Case: Reporting a Software Bug
Let's say you're trying to report a software bug to your IT department. A clear screenshot is crucial.
- Replicate the Error: Perform the action that causes the error message to appear.
- Capture the Window: Instead of using the full-screen PrtSc key, press Alt + PrtSc to capture only the error message dialog box. This isolates the problem and removes distracting background elements.
- Annotate: Paste the screenshot into an image editor (like Paint or the Snipping Tool editor). Use a red box to draw attention to the specific error code. Add a text note if further clarification is needed.
- Share: Save the annotated image and attach it to your support ticket. The IT team now has a clear, focused visual of the exact problem, allowing them to resolve it much faster.
Frequently Asked Questions (FAQ)
1. Where do screenshots go on an HP laptop?
It depends on the method used. If you press PrtSc, the image is copied to your clipboard, and you must paste it somewhere to save it. If you use Windows Key + PrtSc, the screenshot is automatically saved in your Pictures > Screenshots folder. Screenshots taken with the Xbox Game Bar are saved in Videos > Captures.
2. How do I take a screenshot on an HP laptop without a Print Screen button?
Many modern or compact HP laptops combine the Print Screen function with another key. Look for a key labeled "PrtSc" or "PrtScn" sharing space with a function key (like F10) or Insert. You'll likely need to press the Fn key simultaneously (e.g., Fn + PrtSc). If you can't find it, the universal shortcut Windows Key + Shift + S will always launch the Snipping Tool.
3. How do you screenshot a specific part of the screen on an HP laptop?
The best way is to use the Snipping Tool. Press Windows Key + Shift + S to launch it. Your screen will dim, and you can select "Rectangular Snip" to click and drag a box around the exact area you want to capture. The selected area will be copied to your clipboard.
4. What is the difference between PrtSc and Windows + PrtSc?
Pressing PrtSc alone copies the entire screen to your clipboard, but it does not save a file. You need to paste the image into an application to use it. Pressing Windows Key + PrtSc both captures the entire screen and automatically saves it as a file in the Pictures > Screenshots folder.
5. How do I take a delayed screenshot on my HP laptop?
The Snipping Tool has a delay feature. Open the Snipping Tool app from the Start Menu, click the clock icon, and choose a delay of 3, 5, or 10 seconds. This is perfect for capturing menus or pop-ups that appear only after you hover or click.
Conclusion
Taking a screenshot on your HP laptop is a straightforward process once you know the right tools for the job. For quick, full-screen captures, Windows Key + PrtSc is the most efficient method. For precise, partial-screen grabs, Windows Key + Shift + S gives you the flexibility you need. By mastering these shortcuts and best practices, you can communicate more effectively and streamline your daily tasks.
While this guide focuses on static images, remember that many of these tools can also capture video. You can explore more about how to screen record on an HP laptop or dive into Windows screen recording best practices. If you use other systems, check out our guides on how to screenshot in Windows 10 or how to screenshot on Mac.
Take Your Communication to the Next Level
When you're ready to move beyond static images and start creating tutorials, feedback videos, or other dynamic content, ShotVu is the perfect next step. Communicate your ideas more clearly with one-click screen recording.