


Need to show someone exactly what’s happening on your Mac screen? Forget fumbling with your phone—a much cleaner way is built right into your computer. The quickest method is a simple keyboard shortcut: Command + Shift + 5. This instantly opens Apple's Screenshot Toolbar, giving you everything you need to capture your screen with just a few clicks. In this guide, we'll walk you through the built-in tools, share tips for professional results, and answer common questions.
Why This Topic Matters
Knowing how to record your Mac's screen is a surprisingly powerful skill in today's digital world. It’s not just for IT support; it's essential for creating quick tutorials for your team, demonstrating a new software workflow, or saving a live webinar for later. Mastering this skill allows you to communicate ideas clearly and efficiently, saving time and avoiding lengthy written explanations. Apple provides two fantastic, free methods right out of the box, making it accessible to everyone.
A Step-by-Step Guide to Recording Your Mac Screen
Ever since macOS Mojave landed in 2018, Apple has made screen recording incredibly simple. You have two primary built-in options: the Screenshot Toolbar for quick captures and QuickTime Player for more control.
Method 1: Using the Screenshot Toolbar (Command + Shift + 5)
For most day-to-day recording tasks, the Screenshot Toolbar is your go-to tool. It’s designed for speed and simplicity.
- Launch the Toolbar: Press the keyboard shortcut Command + Shift + 5. A small control panel will appear at the bottom of your screen.
- Choose Your Recording Area:
- Record Entire Screen: Click the icon showing a screen with a solid circle in the corner.
- Record Selected Portion: Click the icon showing a dotted-line box with a solid circle in the corner. You can then drag to select the exact area you want to capture.
- Configure Your Options: Before recording, click the "Options" button to customize your settings.
- Save to: Choose where your video file will be saved (Desktop is the default).
- Timer: Set a 5 or 10-second countdown to get ready before recording starts.
- Microphone: This is critical. If you want to add a voiceover, select your "Built-in Microphone" or an external mic here.
- Start and Stop Recording: Click the "Record" button to begin. To stop, click the small stop icon that appears in your menu bar at the top of the screen, or press Command + Control + Escape.
Method 2: When to Use QuickTime Player for More Control
The Screenshot Toolbar is fantastic for quick recordings, but for more polished tutorials, QuickTime Player offers a few extra features.
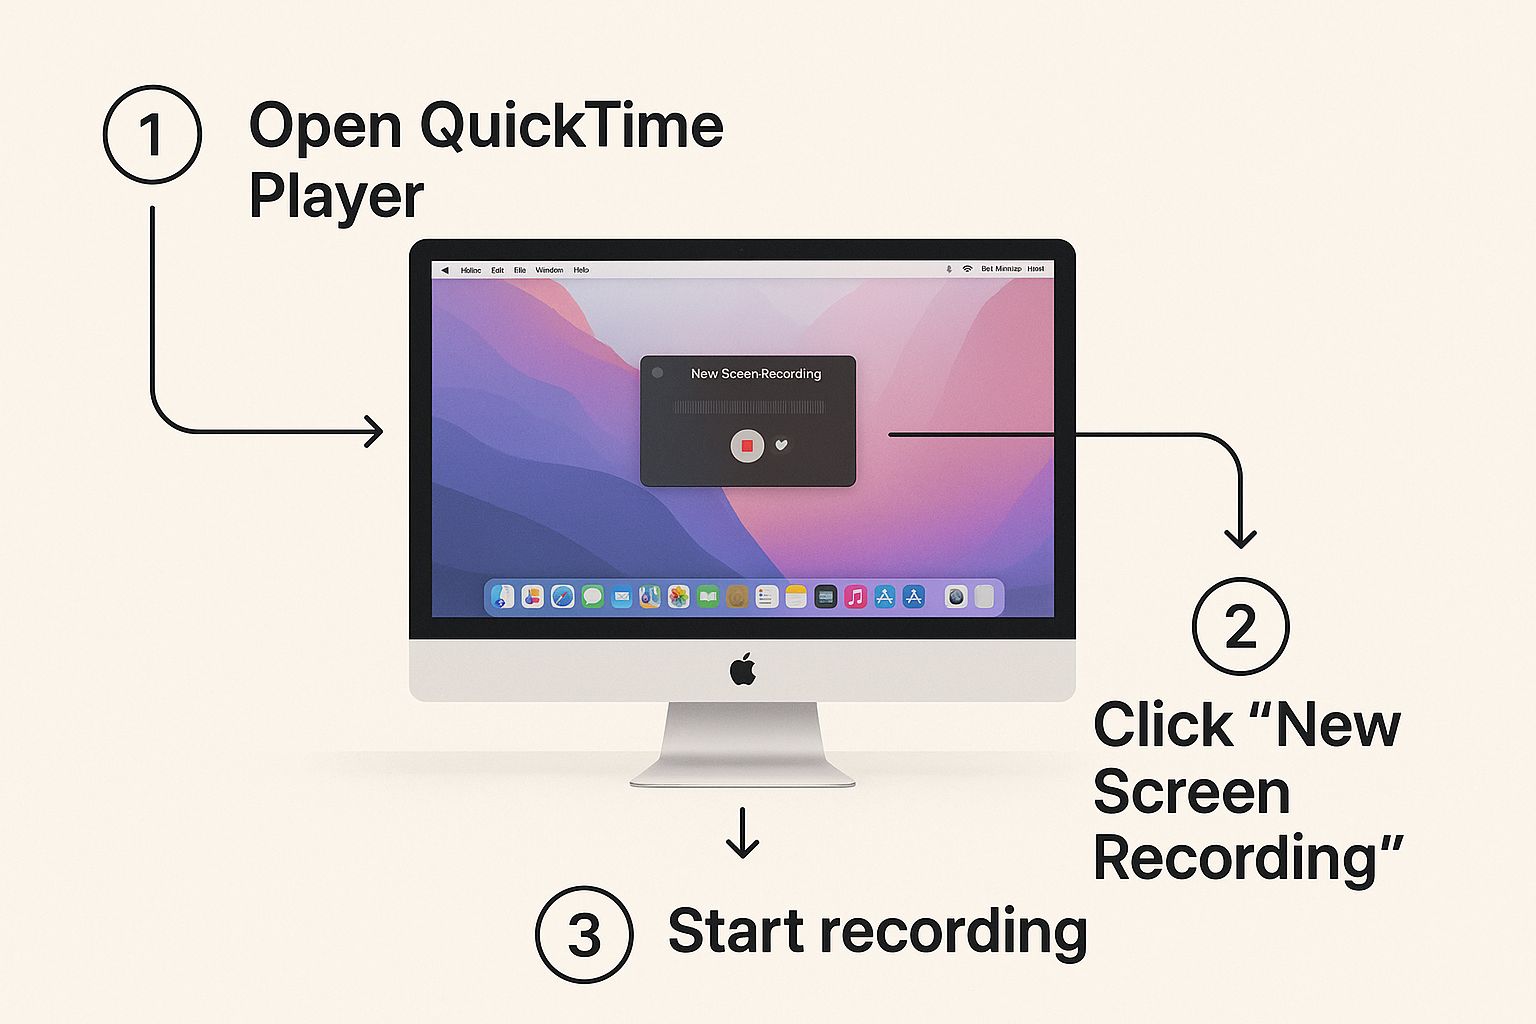
- Launch the App: Open QuickTime Player from your "Applications" folder.
- Start a New Recording: In the menu bar, go to File > New Screen Recording. You'll see a control panel very similar to the Screenshot Toolbar.
- Enable Visual Cues: One of QuickTime’s best features for tutorials is in the "Options" menu: Show Mouse Clicks. When enabled, a black circle will flash around your cursor every time you click, providing a clear visual guide for your audience.
- Record and Edit: Record your screen as you would with the other method. When you stop, the video automatically opens in QuickTime, allowing you to immediately trim the beginning or end of the clip without saving and reopening it.
This seamless record-then-edit workflow is ideal for creating a more refined final video. If you're also trying to manage a webcam feed, our guide on how to record your screen and video at the same time has some great tips.
Tips and Best Practices for a Professional Recording
Anyone can hit "record," but creating a polished video that people want to watch takes a bit of finesse. The biggest difference between an amateur and a pro recording happens before you even press the record button.
- Set the Stage: Think of your screen as a stage. Tidy up your desktop by hiding files and icons. A clean, branded, or neutral wallpaper looks far more professional.
- Close Unnecessary Apps: Keep only the essential apps and browser tabs open. This prevents distractions and helps your Mac run smoother for a lag-free recording.
- Enable 'Do Not Disturb': This is non-negotiable. Go to your Mac's Control Center and turn on a Focus mode like 'Do Not Disturb' to prevent notifications from ruining your take.
- Use an External Microphone: Your Mac’s built-in mic is fine, but an external USB mic or headset will make your voice sound significantly clearer and more professional.
- Move Your Mouse Deliberately: Move your cursor slowly and purposefully. It helps guide your viewer's eye and makes your on-screen actions feel calm and easy to follow.
For a deeper dive, check out our guide on professional presentation recording tips to help you craft even more compelling video content.
Examples of When to Record Your Screen
Screen recording is a versatile tool. Here are a few real-life scenarios where it comes in handy:
- Creating a Software Tutorial: Imagine you need to show a teammate how to use a new piece of software. Instead of writing a long email, you can use the Screenshot Toolbar to record a quick demo with your voiceover in under a minute. It’s perfect for fast, clear communication.
- Documenting a Bug: When you encounter a technical issue, a screen recording showing the problem as it happens is invaluable for IT or support teams. It eliminates guesswork and helps them diagnose the issue faster.
- Saving a Live Webinar: If you can't attend a live event or want to re-watch a presentation, recording your screen allows you to save the content for later reference. (Always be mindful of copyright and terms of service.)
- Giving Personalized Feedback: Instead of just marking up a document, you can record your screen while you review it, providing verbal feedback and pointing to specific areas. This adds a personal touch and can be much clearer than written comments alone.
FAQ: Your Mac Screen Recording Questions Answered
Even after you've got the hang of the tools, a few questions often pop up. Here are clear answers to the most common ones.
1. Where do screen recordings go on a Mac?
By default, Apple saves your recordings directly onto your Desktop. The files are usually named with the date and time. You can easily change this location in the "Options" menu of the Screenshot Toolbar (Command + Shift + 5) to save them to your Documents folder, the Clipboard, or any other spot you prefer. For more details, see these insights into Mac recording files on krisp.ai.
2. Can I record my Mac's internal audio with the built-in tools?
No. For privacy and copyright reasons, the built-in Screenshot Toolbar and QuickTime Player are designed not to capture your Mac's system audio (like app alerts or sound from a playing video). They can only record external sound through a selected microphone. If you need to capture system audio, you'll have to use a third-party application.
3. How do I edit a screen recording on a Mac?
Yes, and basic edits are easy. After stopping a recording, a thumbnail appears in the bottom-right corner. Click it to open a preview where you can immediately trim the start and end. For more control, open the video file with QuickTime Player to trim, split, and rearrange clips. For more advanced editing like adding titles, the free iMovie app on your Mac is the perfect next step. Learn more about how to edit a screen recording on a Mac.
4. What is the fastest way to stop a screen recording?
The most obvious way is to click the stop icon in your menu bar. However, the quickest method is the keyboard shortcut: Command + Control + Escape. This instantly stops the recording and saves the file, no mouse-clicking required.
5. Is screen recording on a Mac secure?
Yes, macOS has built-in privacy features. A persistent icon appears in your menu bar whenever you're recording, and apps must get your explicit permission before they can capture your screen. You can learn more about these privacy measures on McAfee's security blog.
Conclusion
You now have everything you need to confidently record your screen on a Mac. By using the Command + Shift + 5 shortcut for quick captures or QuickTime Player for more detailed tutorials, you can create clear, effective videos for any purpose. Remember to prepare your workspace, check your microphone settings, and use a few of the pro tips we’ve shared to elevate the quality of your recordings.
For a complete walkthrough and more in-depth answers, you can check out our full guide on how to record on Mac.
Call to Action
Ready to move beyond the basics and create polished, shareable video content in seconds? ShotVu offers one-click recording, an AI-powered teleprompter, secure cloud storage, and instant sharing. Try ShotVu today and replace your next meeting with a clear, concise video update.