


How Do You Record Screen on Mac: A Simple Guide

Wondering how do you record screen on Mac? This guide covers the built-in Screenshot Toolbar and QuickTime Player for high-quality, professional recordings.
Ready to capture your Mac's screen? Whether you're creating a software tutorial, demonstrating a process, or saving a crucial video clip, macOS has powerful, easy-to-use tools built right in. This guide will walk you through everything you need to know about using the Screenshot Toolbar and QuickTime Player to create high-quality screen recordings without any extra software.
Why This Topic Matters
Knowing how do you record screen on mac isn't just another tech skill—it's a massive upgrade for how you communicate. Instead of typing out a long, confusing email to explain a software bug, imagine sending a quick 30-second video that shows the exact problem. This kind of clarity speeds up problem-solving and makes working with a team so much smoother.
For teachers, screen recording is a game-changer, letting them create tutorials students can watch over and over. In the business world, it’s essential for everything from onboarding new hires and demoing products to creating marketing content that actually grabs attention. When you get the hang of your Mac’s built-in tools, you unlock a much faster way to share ideas and tell stories visually. The fundamentals are universal, too; mastering them here makes it easier if you ever need to use something like a Microsoft screen recorder for Windows 10.
By capturing your screen, you transform abstract explanations into concrete demonstrations. This shift from "telling" to "showing" is the key to effective digital collaboration.
And it’s a skill that’s only growing in demand. Recent data shows that around 45% of Mac users in the U.S. and Europe now use built-in screen recording tools every month, largely thanks to the rise of remote work and online learning. You can learn more about the rise of screen recording usage and see just how central this skill has become.
A Step-by-Step Guide to Recording Your Mac Screen
Your Mac offers two primary built-in methods for screen recording: the Screenshot Toolbar for quick captures and QuickTime Player for more control. Both are incredibly effective, and choosing the right one depends on your needs.
Method 1: Using the Screenshot Toolbar for Fast Recordings
When you need a quick recording without any extra software, the built-in Screenshot Toolbar is your best friend. It's already there, baked right into macOS, making it perfect for spontaneous captures or simple how-to clips.
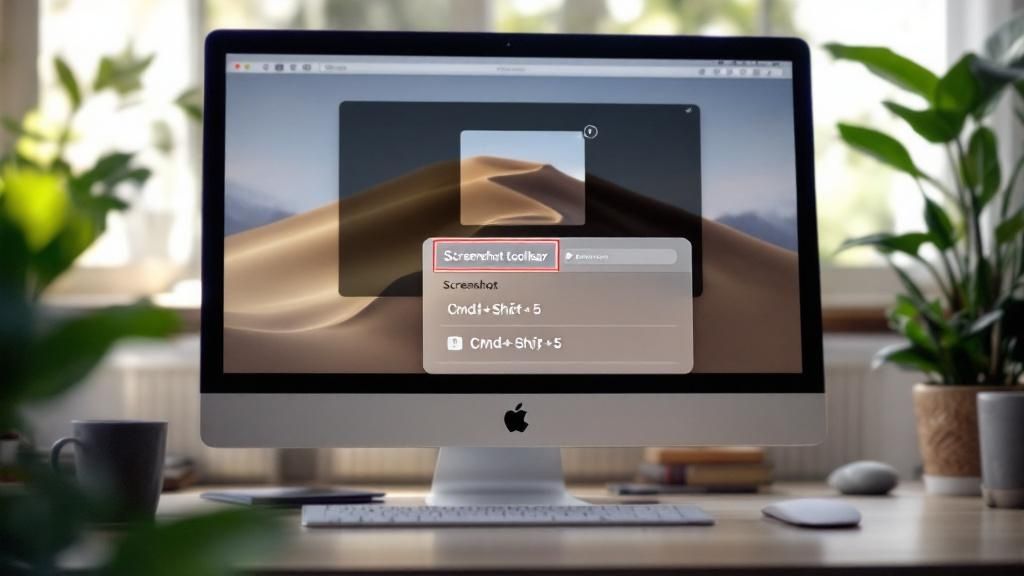
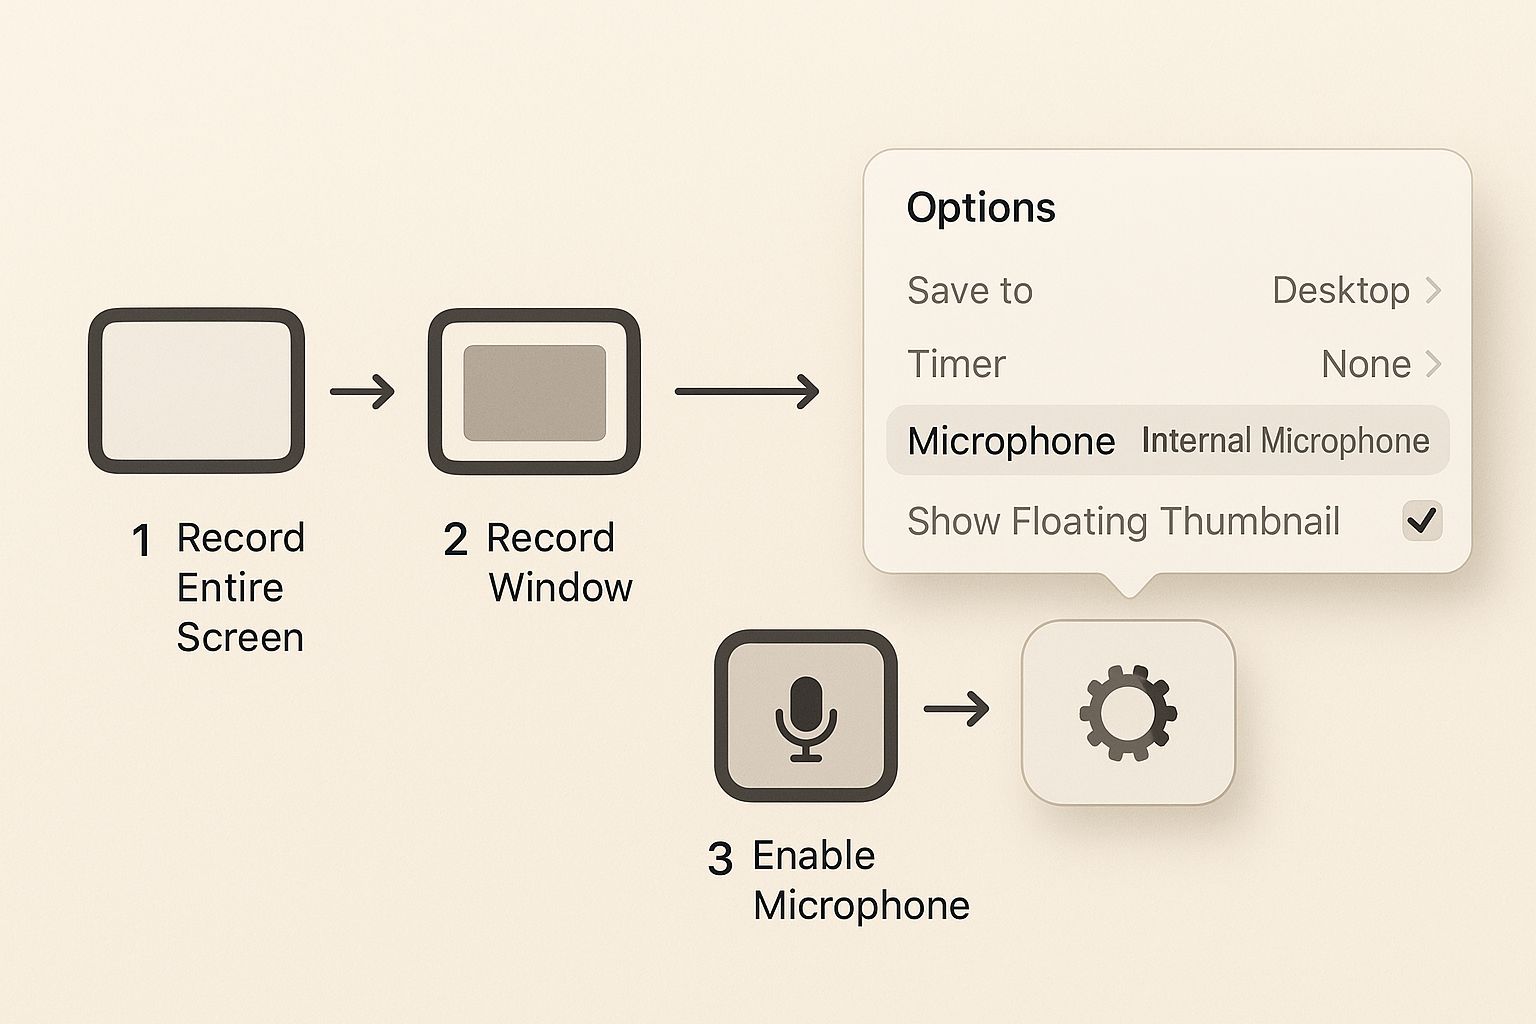
- Open the Toolbar: Press Shift-Command-5 on your keyboard. This shortcut brings up a handy control panel at the bottom of your screen.
- Choose Your Recording Area: You have two main choices. Click the icon with a solid outline and a circle in the corner to Record Entire Screen, or click the icon with a dotted outline and a circle to Record Selected Portion. If you choose the latter, simply drag the box to select the specific area you want to capture.
- Configure Your Options: Before recording, click the 'Options' menu. Here you can:
- Set a Timer: A 5 or 10-second countdown is great for getting your windows arranged.
- Choose Your Microphone: Select your Mac’s built-in mic or any external one you have plugged in to add a voiceover.
- Select a Save Location: By default, files save to your Desktop. You can change this to your Documents folder or another location to stay organized.
- Show Mouse Clicks: Enable this to display a circle around your cursor on each click, which is invaluable for tutorials.
- Start and Stop Recording: Click the 'Record' button to begin. To stop, click the stop icon (a circle with a square inside) in the menu bar at the top of your screen, or use the keyboard shortcut Command-Control-Escape.
Method 2: Using QuickTime Player for More Control
While the Screenshot Toolbar is perfect for quick recordings, QuickTime Player offers a more deliberate workflow that's ideal for planned sessions. It provides a dedicated control window and allows for immediate trimming after you finish.
- Open QuickTime Player: Find and open QuickTime Player from your Applications folder.
- Start a New Recording: In the menu bar, navigate to File > New Screen Recording. This will open a control window similar to the Screenshot Toolbar.
- Adjust Your Settings: Use the dropdown arrow next to the red record button to select your microphone and choose whether to show mouse clicks.
- Record Your Screen: Click the red record button. You will then be prompted to either click anywhere to record the full screen or drag to select a specific area.
- Stop and Edit: Once you're done, click the stop icon in the menu bar. QuickTime will automatically open the video, allowing you to immediately review and trim the beginning or end using Edit > Trim (or Command-T).
- Save Your File: Go to File > Save to choose a name and location for your final video.
If you want to get even faster with keyboard commands, you can learn how to record your Mac screen with keyboard shortcuts in our other guide.
Tips and Best Practices for Professional Recordings
Knowing the basics of how you record screen on Mac is a great start, but creating a polished video is all about the details. Follow these tips to elevate the quality of your recordings.
- Prepare Your Workspace: Before you hit record, tidy up your digital workspace. Close any unnecessary apps and browser tabs, choose a clean desktop background, and most importantly, turn on "Do Not Disturb" mode to prevent notifications from ruining your take.
- Ensure Clear Audio: Bad audio can ruin a great video. Find a quiet spot to minimize background noise. Sit a comfortable distance from your microphone and speak clearly and at a steady pace. For a deeper dive, check out our guide on how to record audio on a Mac.
- Perform a Quick Trim: The single most impactful edit you can make is trimming the start and end of your video. This simple step removes the awkward moments of starting and stopping the recording, making the final cut look clean and intentional.
- Manage File Size: High-quality screen recordings can be massive. By default, your Mac saves them as
.movfiles. To reduce file size for easier sharing, use QuickTime Player to export your video at a lower resolution (e.g., 1080p instead of 4K). This dramatically shrinks the file without a significant loss in visual quality.
Example Use Cases for Screen Recording
Screen recording is a versatile tool that can be applied in numerous personal and professional scenarios. Here are a few real-world examples:
- Creating a Software Tutorial: An IT specialist records their screen to create a step-by-step video guide showing new employees how to use the company's internal project management software. They use the "Show Mouse Clicks" feature to make the instructions easy to follow.
- Reporting a Technical Bug: A user experiencing a recurring software glitch records their screen to capture the exact sequence of actions that triggers the error. They send this short video to the support team, providing a clear, undeniable demonstration of the problem, which leads to a much faster resolution.
- Saving Online Content: A student records a portion of their screen to save a key segment from a live-streamed university lecture for later review. This allows them to focus on complex concepts without having to re-watch the entire two-hour session.
FAQ: Frequently Asked Questions
Learning how to record your screen on a Mac is usually a breeze, but a few common questions often arise. Here are clear answers to the most frequent issues.
How do I record my screen on a Mac with internal audio?
You cannot record internal system audio (like sound from a YouTube video or a game) using Apple's native screen recording tools. For privacy and copyright reasons, the Screenshot Toolbar and QuickTime Player are designed only to capture external audio through a microphone. If you run into other audio problems, you might find answers by exploring why your Mac screen recording is not capturing audio.
Where are my Mac screen recordings saved?
By default, your Mac saves all screen recordings directly to your Desktop with a name like "Screen Recording 2023-10-27 at 11.30.00 AM.mov". To change this, press Shift-Command-5, click the 'Options' menu, and select a different folder under the 'Save to' section.
Why is my screen recording file so big?
Your Mac saves recordings as high-quality .mov files to preserve visual clarity, but this results in large file sizes. To manage this, record only the specific portion of the screen you need. After recording, you can also use QuickTime Player to export the video at a smaller resolution (e.g., 1080p), which will significantly reduce the file size.
Can I use a keyboard shortcut to stop recording?
Yes. The quickest and cleanest way to end a recording is by pressing Command-Control-Escape. This is especially useful when recording a full-screen application where the menu bar and stop button are hidden.
Summary
Mastering your Mac’s built-in screen recording tools is a simple way to enhance how you communicate, teach, and solve problems. By using the Shift-Command-5 shortcut for the Screenshot Toolbar or the more controlled workflow of QuickTime Player, you can create clear and effective videos in minutes. Remember to prepare your workspace, ensure good audio quality, and trim your final video for a professional touch.
Take Your Recordings to the Next Level
Ready to move beyond the basics and create professional-quality screen recordings with ease? ShotVu offers powerful features like cloud storage, instant sharing, and a built-in teleprompter to make your video creation process seamless. Try ShotVu today and see how simple async video communication can be.