


Microsoft Screen Recorder Windows 10: The Ultimate Guide

Discover how to master the Microsoft screen recorder Windows 10 provides. This guide offers practical tips for capturing high-quality video effortlessly.
Looking for a quick way to record your screen on Windows 10 without downloading extra software? You're in luck. Windows 10 includes a built-in Microsoft screen recorder called the Xbox Game Bar, a surprisingly effective tool for capturing app windows, creating tutorials, or recording gameplay. This guide will walk you through everything you need to know to master it.
Why This Topic Matters
In today's digital world, the ability to create screen recordings is more important than ever. Whether for creating training materials, reporting software bugs, or sharing a presentation, a screen recorder is an essential tool. The built-in Windows 10 recorder saves you the time and potential security risks of finding and installing third-party software, offering a convenient, integrated solution that's already on your PC. The shift to remote work highlighted this need, as Microsoft Teams usage skyrocketed, and the demand for capturing virtual meetings and presentations grew exponentially.
Step-by-Step Guide: How to Use the Microsoft Screen Recorder in Windows 10
Ready to capture your first video? Getting started with the built-in Microsoft screen recorder in Windows 10 is refreshingly simple. The key is knowing the right keyboard shortcut and a few basic controls.
Step 1: Open the Target Application
First, you'll want to open the application you plan to record. This is a critical detail: the Xbox Game Bar records one application at a time, not your entire desktop, so make sure your target app is the active window.
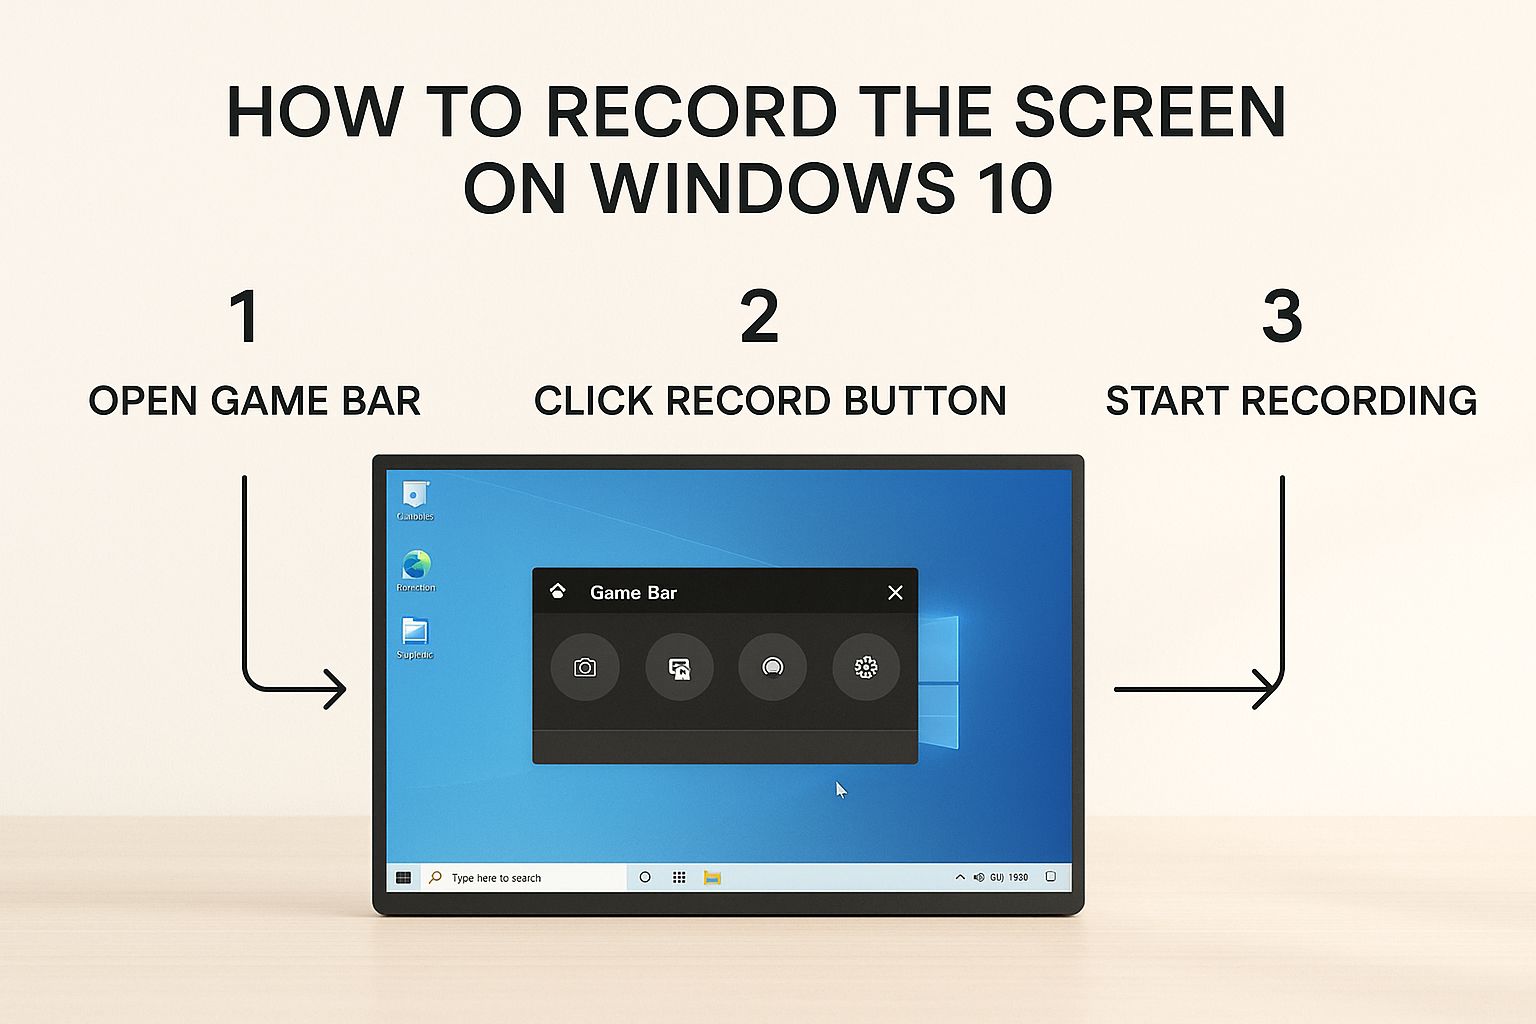
Step 2: Launch the Xbox Game Bar
Once your app is front and center, press the Windows key + G on your keyboard. This command brings up the Xbox Game Bar overlay, which appears right on top of your current window.
Step 3: Start and Stop Your Recording
In the overlay, look for the "Capture" widget. If you don't see it, click the widget menu icon (it looks like a bulleted list) on the main bar and select "Capture."
- To start recording: Click the round record button or use the shortcut Windows key + Alt + R. A small recording timer will pop up on your screen.
- To stop recording: Click the stop button on the timer bar or use the same shortcut, Windows key + Alt + R.
Your videos are automatically saved. Windows stores all screen recordings in a dedicated "Captures" folder, which lives inside your main "Videos" library in File Explorer. For a deeper dive into what this tool can do, check out our full article on whether Windows 10 allows screen recording.
Step 4: Fine-Tune Your Settings (Optional)
While the default settings are great for quick captures, you can optimize video and audio quality. Navigate to Settings > Gaming > Captures to adjust:
- Video Quality: Choose between "Standard" (smaller files) and "High" (crisper image).
- Video Frame Rate: Select 30 FPS for standard recordings or 60 FPS for smooth, fast-paced action like gaming.
- Audio Settings: You can record app audio, your microphone, or both simultaneously. This is perfect for adding voiceovers to tutorials. For more advanced techniques, learn how to record your screen and video at the same time in Windows 10.
The fact that this tool is so well-integrated is a huge plus, especially since Windows 10 is still a powerhouse. While Windows 11 has grown, Windows 10 remains on a significant number of desktops worldwide, making its built-in recorder a go-to tool for millions. You can discover more insights about market share on Times of India.
Tips, Best Practices, and Common Mistakes
A great screen recording is about more than just hitting the record button. Use these tips to create a polished, professional video.
Best Practices
- Prepare Your Screen: Close any unnecessary applications to prevent pop-up notifications and free up system resources. A clean desktop background helps viewers focus.
- Master Keyboard Shortcuts: Using shortcuts makes your workflow seamless and saves editing time.
- Start/Stop Recording:
Win + Alt + R - Mute/Unmute Mic:
Win + Alt + M - Open the Game Bar:
Win + G
- Start/Stop Recording:
- Plan Your Recording: Since the Game Bar only records one app, plan your steps to stay within that single window. If you need to show file management, open the files in a compatible app that the Game Bar can record.
For more advanced tips, check out these Windows screen recording best practices.
Common Mistakes to Avoid
The biggest mistake is forgetting the tool's main limitation. The Microsoft screen recorder for Windows 10 cannot record your full desktop or the File Explorer. Trying to do so is the most common reason users find the record button grayed out. Always ensure you have a compatible application as your active window before you begin.
Examples and Use Cases
The Xbox Game Bar is surprisingly versatile. Here are a few real-world examples of how you can use it:
- Creating a Software Tutorial: Record yourself demonstrating a feature in an application like Excel or Photoshop to share with your team.
- Capturing Gameplay: As its name suggests, it's perfect for recording your best gaming moments to share with friends.
- Recording a Video Call: Capture a Microsoft Teams or Zoom meeting (with permission) to keep a record of important discussions.
- Saving a Live Presentation: Record a webinar or online class to review the content later.
FAQ: Microsoft Screen Recorder Windows 10
Here are answers to some of the most frequently asked questions about the built-in screen recorder.

1. Where do my screen recordings get saved?
By default, all your recordings are automatically saved as MP4 files in a folder named "Captures" inside your Videos folder. You can find it by navigating to This PC > Videos > Captures. You can also change this default location in Settings > Gaming > Captures.
2. Why is the record button grayed out?
This almost always happens because you are trying to record an unsupported screen, like the Windows desktop or File Explorer. The Xbox Game Bar is designed to record single applications. Make sure a compatible app is the active window, and the record button will become available. If you're still stuck, check our guide on why you can't record your screen on Windows 10.
3. Can I record my entire desktop with the Game Bar?
No, the built-in tool does not support full desktop or multi-window recording. It is limited to capturing the content within a single application window at a time.
4. How do I record audio from my microphone and the system?
Yes, you can. The Game Bar overlay gives you control over audio sources. You can choose to record just the app/system audio, just your microphone for a voiceover, or both at the same time for tutorials. You can even mute your mic mid-recording with the Win + Alt + M shortcut.
5. Will screen recording slow down my PC?
The Xbox Game Bar is lightweight and designed to have a minimal performance impact. On most modern PCs, you won't notice any slowdown during standard recordings. However, capturing at high quality (60 FPS) while running a demanding application like a video game may cause a slight performance drop on older hardware.
Conclusion
You are now equipped to use the built-in Microsoft screen recorder for Windows 10 like a pro. Its beauty lies in its simplicity and integration—no downloads or subscriptions are needed. For quick captures, software demos, and simple tutorials, the Xbox Game Bar is a fantastic, readily available tool.
The best way to get comfortable is to start using it. Record a short video, test the different audio and video settings, and master the keyboard shortcuts.
Call-to-Action
For projects that require more advanced features—like editing, annotations, or recording your entire desktop—you'll eventually need a more powerful, dedicated tool. When you reach that point, a specialized solution can dramatically improve your workflow.
See how ShotVu offers powerful recording and sharing features designed to take your video creation to the next level.