


Introduction
Need to show someone exactly what’s happening on your Mac screen? Knowing how to record your screen is a powerful skill for creating software tutorials, reporting bugs, or walking colleagues through a workflow. This guide will walk you through the simple, built-in tools macOS provides, ensuring you can capture high-quality video with ease.
Why This Topic Matters
In a world of remote work and digital communication, a quick screen recording is often more effective than a long email or a scheduled meeting. Instead of trying to describe a complex process with words, you can show it in seconds. Mastering screen recording on your Mac helps you communicate more clearly, save time, and create helpful, reusable content for your team, clients, or audience. The good news is, you don't need to buy any fancy software; Apple has already built powerful tools right into your operating system.
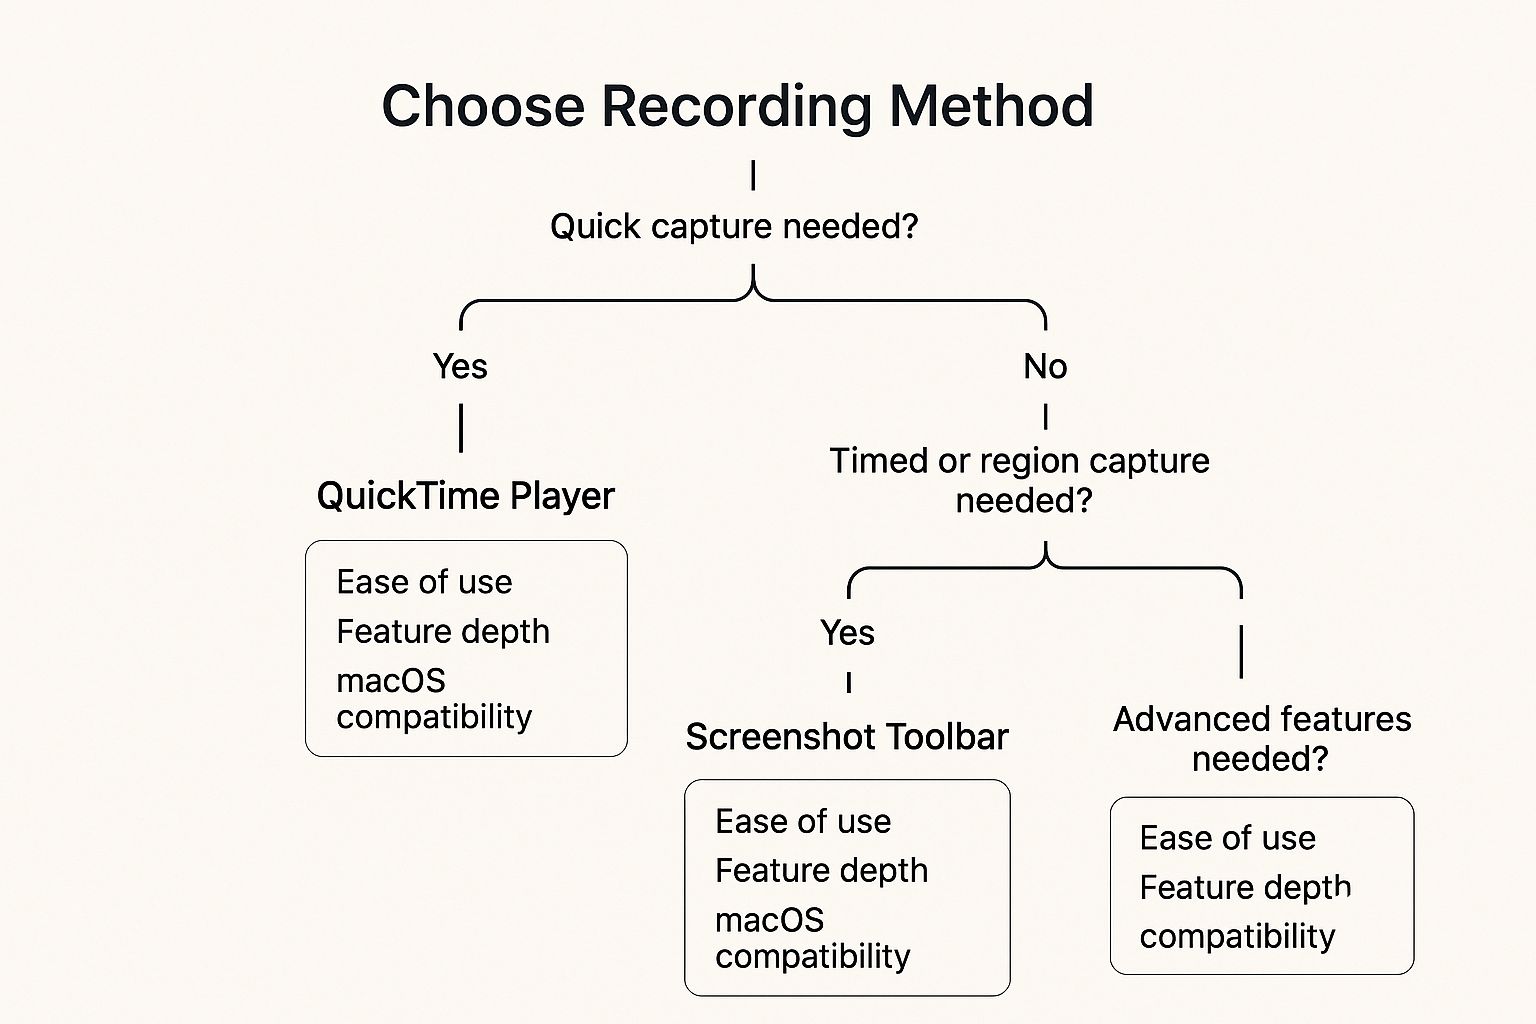
Step-by-Step Guide: How to Record Your Mac Screen
Your Mac offers two excellent, free methods for screen recording: the Screenshot Toolbar and QuickTime Player. For most situations, the Screenshot Toolbar is the fastest and most flexible option.
Method 1: Using the Screenshot Toolbar (The Quickest Way)
This is the go-to method for speed and convenience. It’s perfect for capturing a specific part of your screen or starting a recording without opening an application.
- Open the Toolbar: Press the keyboard shortcut Command + Shift + 5. A control bar will appear at the bottom of your screen.
- Choose Your Recording Area:
- To record the entire screen: Click the icon with a solid outline (a rectangle with a circle in the corner).
- To record a portion of the screen: Click the icon with a dotted outline. A resizable box will appear; drag the corners to select the exact area you want to capture.
- Configure Your Options: Before you record, click the "Options" dropdown menu to customize your settings. Here you can:
- Set a Timer: Choose a 5 or 10-second countdown to give yourself time to prepare.
- Choose a Microphone: Select "Built-in Microphone" to record your voice or choose an external mic for better quality.
- Set the Save Location: By default, files save to your Desktop. You can change this to Documents, Clipboard, or another folder.
- Start and Stop Recording:
- Click the "Record" button to begin.
- To stop, click the small square stop icon that appears in the top menu bar, or press Command-Control-Escape. Your video file will be saved to your chosen location.
Method 2: Using QuickTime Player (For More Control)
The classic QuickTime Player application offers a few features the toolbar doesn't, like a visible audio meter.
- Open QuickTime Player: Find it in your "Applications" folder and open it.
- Start a New Recording: In the top menu bar, go to File > New Screen Recording. A small recording window will appear.
- Check Your Audio Levels: Click the arrow next to the red record button. You can select your microphone here and, most importantly, see a live volume meter to check if your audio is too loud or quiet before you start.
- Enable Mouse Clicks: In the same dropdown menu, you can select "Show Mouse Clicks in Recording." This adds a visual indicator every time you click, which is great for tutorials.
- Start and Stop Recording:
- Click the red record button. If you want to record the full screen, click anywhere. To record a portion, drag a box and then click "Start Recording."
- To stop, click the stop icon in the menu bar. The video will open automatically in QuickTime, ready for you to trim or save.
If you're looking for a full breakdown of your options, exploring different ways to record a video on your Mac can unlock even more creative flexibility.
Tips and Best Practices for Professional Recordings
Knowing how to hit record is just the first step. Follow these tips to make your screen recordings look and sound polished and professional.
- Clean Your Desktop: A cluttered desktop is distracting. Before recording, hide your desktop icons or move all files into a temporary folder. Use a neutral wallpaper.
- Enable "Do Not Disturb": Prevent notifications from popping up mid-recording. Click the Control Center icon in the menu bar and turn on Do Not Disturb.
- Prioritize Audio Quality: Bad audio is more distracting than bad video. If possible, use an external USB microphone instead of the built-in one. It will make your voice sound clearer and reduce background noise. For more tips, see our guide on how to screen record with sound.
- Move Your Mouse Deliberately: Your cursor guides the viewer's eye. Avoid frantic, jerky movements. Move smoothly and intentionally from one point to the next, pausing briefly on important elements.
- Use the Countdown Timer: The 5 or 10-second timer in the Screenshot Toolbar is perfect for getting your windows and cursor in place before the recording begins.
Examples of When to Record Your Screen
Screen recordings are incredibly versatile. Here are a few real-world scenarios where they are invaluable:
- Creating a Software Tutorial: Imagine you need to train a new team member on your company's CRM. Instead of a live call, you can record on Mac a short, 5-minute video walking them through logging in, finding a customer record, and updating a field. They can re-watch it anytime.
- Reporting a Technical Bug: You've found a glitch on your website where a button isn't working. Instead of trying to describe the bug in a support ticket, you can record your screen showing the steps you take, the button you click, and the error that occurs. This gives IT the exact information they need to replicate and fix the issue.
- Providing Feedback on a Design: A designer sends you a mockup for a new landing page. You can record your screen while scrolling through the design, using your voice and cursor to point out what you like and what changes you'd suggest. It's faster and more personal than writing a long list of comments.
FAQ: Common Questions About Mac Screen Recording
Here are answers to some of the most frequently asked questions about recording the screen on a Mac.
1. How do you record the screen on a Mac with internal audio?
By default, macOS’s built-in tools cannot record system audio (the sound coming from your applications). This is for privacy and copyright reasons. To capture system sound, you need a third-party tool like BlackHole, a free utility that creates a virtual audio device to route your Mac's audio into the screen recorder.
2. How do I stop a screen recording on my Mac?
There are two easy ways to stop a recording. You can either click the small square stop button that appears in the menu bar at the top of your screen, or you can press the keyboard shortcut Command-Control-Escape.
3. Where are my Mac screen recordings saved?
By default, all screen recordings are saved directly to your Desktop. The files are automatically named with the date and time, like "Screen Recording 2024-10-27 at 11.15.00 AM.mov". You can change this destination in the "Options" menu of the Screenshot Toolbar (Command + Shift + 5).
4. Do Mac screen recordings create large files?
Yes, video files can be quite large, especially if they are long or high-resolution. To keep file sizes manageable, record only a portion of the screen, keep your videos concise, and consider using a free tool like HandBrake to compress the video after you're done. While these built-in tools are great, the best free screen recorder for Mac can offer more advanced compression options.
Conclusion and Key Takeaways
Recording your screen on a Mac is a straightforward process thanks to the powerful built-in tools. For most users, the Screenshot Toolbar (Command + Shift + 5) is the fastest and most efficient way to capture video. For those who need to check audio levels beforehand, QuickTime Player remains a solid choice.
By following best practices like cleaning your desktop, using a good microphone, and moving your cursor deliberately, you can elevate a simple capture into a professional-quality video. The next step is to practice—try recording a short tutorial or a bug report to get comfortable with the workflow.
Call-to-Action
Ready to move beyond basic captures and create polished, shareable video content with ease? ShotVu offers a powerful screen recording platform with one-click capture, a built-in teleprompter, and secure cloud storage. Replace endless meetings with clear, asynchronous video updates. Try ShotVu today and see how easy professional screen recording can be.